Subscribe in a reader OR Subscribe to ComputerWorld by Email

Recently Posts
Showing posts with label windows7. Show all posts

As it has been announced earlier, in new operational system Windows 7 it is possible to easily change a background of a logon screen. For this purpose it is not required to change resources in executable files or to carry out still any special actions. Process of changing of the image is very simple and can be executed without use of additional tools. This functionality is accessible and correctly works since 7057 build.


To change a background on the logon screen it is necessary to do following steps.

  1. To open the registry editor and to find section “HKEY_LOCAL_MACHINE –> Software –> Microsoft –> Windows –> CurrentVersion –> Authentication –> LogonUI –> Background”. In this section there is a special key “OEMBackground” (DWORD type). Value “1” herein says that it is necessary to use special appearance of the logon screen. If the key does not exist, he can be created manually.
  2. To be convinced, that there is folder “%windir%\system32\oobe\info\backgrounds”. Here Windows 7 will search for background images for the logon screen. If this folder does not exist, she is necessary for creating.
  3. To put in this folder all necessary images. For each screen resolution it is necessary to put the image in this folder with a specific name. If the image with the necessary name is not found, file backgroundDefault.jpg will be used. It is important, that each image should be no more than 256 KB, differently it will be ignored. The list of files which are necessary for putting in this folder:
    1. backgroundDefault.jpg
    2. background768×1280.jpg  (0.6)
    3. background900×1440.jpg  (0.625)
    4. background960×1280.jpg  (0.75)
    5. background1024×1280.jpg (0.8)
    6. background1280×1024.jpg (1.25)
    7. background1024×768.jpg  (1.33)
    8. background1280×960.jpg  (1.33)
    9. background1600×1200.jpg (1.33)
    10. background1440×900.jpg  (1.6)
    11. background1920×1200.jpg (1.6)
    12. background1280×768.jpg  (1.66)
    13. background1360×768.jpg  (1.770833)
  4. For display of changes there is no necessity to reboot. It is enough to lock Windows (Win + L) or to leave a current session (Log off).

Also it is possible to take advantage of 3rd-party utilities. One of such utilities – Tweaks Logon Changer for Windows 7. This utility will execute all necessary changes in the system registry, and also will compress the image till the necessary sizes and will put in the necessary folder.

Tweaks Logon Changer for Windows 7

From: geekswithblogs.net

Read More >>>>

DiggIt! Del.icio.us Reddit

Gmail notifier for Windows 7 is a utility that is non-dependant of the browser and notifies you with the new mails in your gmail inbox and lets you enjoy with more options of Gmail independently in Windows 7.

It not only allows you to have the mail count, but also the mail previews from the taskbar, also when the mails are opened from the inbox, you are automatically logged into the browser version of Gmail. It is using Gmail secured RSS feed to retrieve the mails so it should be pretty safe. Credentials are saved using a machine’s dependent encryption.

Clicking on any mail would open it in Gmail, and the software is compatible with Windows 7 OS. Moreover, this tool does not come in the list of Alt + Tab windows, but sits just beside the Windows icon between the shortcut icons.

Download the Gmail notifier for Windows 7 from here.
gmail notifier

Read More >>>>

DiggIt! Del.icio.us Reddit

The critics and Windows users will likely amazed with the born of this RC 1. To avoid “spicy” criticism from customers, Microsoft now put extra consideration to the development of Windows 7.

In the previous beta version, users are given the opportunity to ‘recognize’ the new features in Windows 7. RC 1 is now comes with the completion of these features.

Prior to installing Windows 7 RC 1, there are 7 important things you should know:

  1. Some new changes;
    • The Taskbar becomes more responsive and feels more comfortable.
    • Music streaming via Windows Media Player.
    • To enable or disable some Windows features. You can now ‘throw’ Internet Explorer 8 and some other Windows’ pre-installed software.
    • Additional Driver Support, now you do not need to search for new drivers when installing Windows 7. The system will automatically recognize the driver.
    • New wallpapers, themes and sound schemes addition.
  2. You don’t need a bootable disk or DVD during the installation of Windows 7. You can do this from within Windows itself.
  3. Installing the upgrade version from the Beta, now is not working on RC 1.
  4. Windows 7 is able to run with VMWare or Virtual PC.
  5. It’s getting easier to repair Windows system. Windows 7 can detect any system error, before you repair it.
  6. Old Windows XP can still run in Windows 7 via Windows XP Mode (XPM) application, how cool is that…
  7. You can enjoy the Windows 7 RC 1 for free for about 1 year, until June, 1 2010.
Read More >>>>

DiggIt! Del.icio.us Reddit

w711

More and more programs are dedicated on enhancing Windows 7 and although, the new OS doesn’t needs much patching, Windows 7 Little Tweaker enables some features that might be useful to anyone. Windows 7 Little Tweaker is a small portable application that works ONLY on Win 7 and ads some little juice to the pie.

Let’s see what goodies can we have:

+ Add “Copy To” option in files and folders context menu, so that you can easily copy them to other locations

+ Add “Move To” option in files and folders context menu, so that you can easily move them to other locations

+ Set Windows to automatically end task of programs which are either hanged or taking longer time than expected to exit

+ Decrease menus show delay time, it’ll show the sub-menus fast when you select their parent menu

+ Disable the low disk space check so that you don’t get the annoying low disk space notification in system tray

+ Set Windows to not waste time in searching for a program which no longer exists in your system when you try to open its shortcut

+ Disable “search on Internet” prompt in “Open with” window so that it directly opens the program list

+ Add “Take Ownership” option in files and folders context menu so that you can easily take ownership of files and folders in case you want to replace them for customization purpose

+ Speed up the Explorer navigation by disabling network printers and network scheduled tasks

+ Add “Command Prompt Here” option on folders context menu (right click) for a quick command prompt opening at the selected folder

+ Adds “Open With Notepad” option on files context menu (right click) for a quick viewing of files content

+ Adds “Delete Folder Content” option on folders context menu (right click) to quick delete only the content of a folder without accessing the folder

+ Speeds up taskbar thumbnail preview by reducing the mouse hover time delay

+ Disables (Turn Off) Annoying UAC (User Account Control) and suppress UAC consent prompt dialog

So,  for the more advanced user, some of those unlocked features can be enabled via registry or by using the control panel and playing around, but overall,  I think Windows 7 Little Tweaker is a nifty little tool that can enchance your Windows Seven experience with some degree.

Download and install Windows 7 Little Tweaker

Read More >>>>

DiggIt! Del.icio.us Reddit

In past we have reviewed Leopard Transformation Pack 2 & Mac OS X Leopart theme to transform Vista to Mac OS X. a latest Windows 7 is almost here and many users are already enjoying Windows 7 RC. We don’t see any reason for users to have Mac OS X like look & feel on Windows 7 RC.

But in case if you are looking for way to transform windows 7 to Mac Os X then Leopard OSX for Win7 RC v2 visual style developed by one of deviantart user is good option for you. Leopard OS X theme will only work with Windows 7 build 7100.

Screenshot of Leopard OS X theme for Windows 7 RC

Windows 7 RC Transformed into Mac Os X Leopard

Windows 7 RC Transformed into Mac Os X Leopard

Download Leopard OS X Theme for Windows 7 RC Build 7100

From: blogsdna.com

Read More >>>>

DiggIt! Del.icio.us Reddit

Download Windows 7 Transformation Theme Pack For Kubuntu 9.04

We can’t deny the fact that most of the Linux OS in the market are has a very user unfriendly interface, possibly because most of us grew up with Windows and got accustomed with the layout. Ubuntu 9.04 on the other hand is trying to change this, among all the Linux OS, Ubuntu has a simple interface and it is easy to learn.

Ubuntu is a community developed, Linux-based operating system that is perfect for laptops, desktops and servers. It contains all the applications you need - a web browser, presentation, document and spreadsheet software, instant messaging and much more.

For those newly converted Linux users, you should download Vistar7 Transformation Pack, it makes Kubuntu 9.04 looks and in some areas works like Windows 7. Screenshot below, download the free Vistar7 Transformation Pack for Ubuntu 9.04.

Download Windows 7 Transformation Theme Pack For Kubuntu 9.04

Read More >>>>

DiggIt! Del.icio.us Reddit

If you couldn’t find your Windows product keys, this little program WinGuggle helps you in recovering your product keys from the windows installation. WinGuggle can recover and Windows XP, Vista and Windows 7 product keys along with Office 2007 product key.

WinGuggle is self executable file, download the application, unzip it and launch the application. It will display the product keys of the windows installation and Office. It also allows you to change OEM logo and other information if you would prefer that.

WinGuggle is a freeware works with Windows XP, Vista and Windows 7 and requires .NET framework for Windows XP.

Read More >>>>

DiggIt! Del.icio.us Reddit

Windows 7 has a neat jumplist feature that allows programs to create links to application-specific tasks from the right click menu that appears when you click on the minimized window button in the taskbar.

Some native Windows applications utilize this feature very well. Internet Explorer 8 on Windows 7 puts your most visited sites in the jumplist as you use it more and more. In the screenshot below, you can see IE 8’s jumplist that has options to specific tasks like InPrivate, New tab etc:

Windows 7 Jumplist

However, Firefox’s current version doesn’t utilize jumplists in a big way. The following screenshot will illustrate the same. It doesn’t do much.

Firefox doesn't take advantage of Windows 7 Jumplist features

Firefox doesn't take advantage of Windows 7's Jumplist features

However, Winfox aims to change all that. Winfox tells Firefox to leverage the Jumplist feature in Windows 7 to do more things.

Winfox pins frequently visited sites to the Firefox jumplist. Thumbnails of open windows are available from the taskbar button as well.

Firefox Jumplist, after Winfox was installed

Firefox Jumplist, after Winfox was installed

Get Winfox from here. Winfox works with Firefox 3 and above.

Read More >>>>

DiggIt! Del.icio.us Reddit

Windows 7 is currently only a beta version, but it’s better than the latest version of Windows Vista and it comes with a lot of new features. Unfortunately, some of them aren’t so easy to figure out, so we created a list of the most important tips and tricks and a step-by-step guide.

  1. PC Safeguard

    I rarely let anyone use my PC because I’m afraid he will mess it up, but it seems Microsoft has been thinking at me and came with a solution. The PC Safeguard doesn’t let anyone mess your PC settings, because after the user logs off, the configurations are reset back to normal. Of course it will not restore the configurations changed by you, but only the ones done by other users you define.

    To use PC Safeguard, go to Control Panel -> User Accounts and create a new account, then select “Set Up Pc Safeguard” and switch it on. Then you can stay relaxed when others use your computer, because you won’t find anything changed, including configurations, downloaded software, installed programs.

  2. Screen Calibration

    Fortunately, Windows 7 comes with a display calibration wizard that lets you set up the screen brightness properly, so you won’t have any problems viewing photos or text. The problem was that on one PC a photo could look sharp and bright and on another it looks awful. Now the problem can be fixed by pressing the Win key and then typing “DCCW”.

  3. AppLocker

    If you are usually sharing your computer with someone else, then you might want to restrict their access to your applications, files or documents. Using the AppLocker tool, you have a few options to do this by blocking other users to access Executables, Windows Installers, Scripts, a specific publisher or path. You can simply do this by pressing the Windows key then typing Gpedit.msc. Then go to Computer Navigation -> Windows Settings -> Security Settings -> Application Control Policies -> AppLocker. Right click on one of the options ( Executables, Installers, or Script ) and create a new rule. That should save you from a lot of headaches.

  4. Burn Images

    We all had trouble with image burning in Windows, because it couldn’t do it itself, a standalone software being needed. With Windows 7 this will not be a problem anymore. All you have to do is double-click the ISO image and burn it on the CD or DVD that’s inserted in the drive.

  5. Display Empty Removable Drives

    Windows 7 will not show empty drives by default, so if you connect an empty drive to your PC, don’t worry, just go to Tools -> Folder Options -> View and uncheck “Hide empty drives in the computer folder”. This doesn’t seem like a good idea and it should not be default setting, because it will be hard for inexperienced users to figure it out. I bet a lot of users will return their newly bought drive thinking it’s broken.

  6. Dock The Current Windows To The Left Side Of The Screen

    This new feature seems useful because sometimes it’s disturbing that windows seems to float like crazy on the screen and it’s hard to attach them to one side of it. Now this can easily be done using a keyboard shortcut. Press the Windows key + Left key to dock it to the left side of the screen.

  7. Dock The Current Windows To The Right Side Of The Screen

    Press the Windows key + Right key to dock it to the right side of the screen.

  8. Display Or Hide The Explorer Preview Panel

    Press ALT + P to hide it then once again to display it.

  9. Display Gadgets On Top Of Other Windows

    Press ALT + G

  10. Background Photo Slideshow

    If you are like me, lazy and bored, then you will want to change the background from time to time, wasting a lot of time. Now you don’t have to do this anymore, because you can set up a slideshow. Right click on the desktop then go to Personalize -> Desktop Background and hold the CTRL key while choosing the images. Then you can choose the time intervals between images and opt to display them randomly or in a row.

  11. Make The Taskbar Smaller

    If you feel like the taskbar is using too much of your screen space, you can choose to make the icons smaller. To do this, right-click on the Start button, then go to Properties -> Taskbar and set it to “Use small icons”

  12. Combine Taskbar Icons

    When you have more windows or applications opened, the taskbar’s space might not be enough for them all, so you need to combine them, just like you would in Windows XP or Vista. To do this, right-click the Start button, then go to Properties -> Taskbar and check “Combine when taskbar is full”.

  13. Multi-threaded File Copy

    If you are a more advanced user, you’ve heard already about Robocopy. Now it’s included in Windows 7 and lets you perform multi-threaded copies from the command line. You can choose the number of threads like this “/MT[:n], which can be from 1 to 128.

  14. Maximize Or Restore The Foreground Window

    Press Windows Key + Up Key.

  15. Minimize The Active Window

    Press Windows Key + Down Key

  16. Activate The Quick Launch Toolbar

    The Quick Launch Toolbar in Windows XP in Vista seems a very good idea that you might miss when using Windows 7. Fortunately though, you can get it back in a quick few steps. Right click the taskbar, go to Toolbar -> New Toolbar and type “%UserProfile%\AppData\Roaming\Microsoft\Internet Explorer\Quick Launch” into the folder box, then click Select Folder. To make it look like it would in Windows Vista, right click the taskbar, uncheck “Lock the Taskbar”, then right click the divider and uncheck “Show Title” and “Show Text”. Then right click the taskbar and check “Show Small Icons” and you should be done.

  17. Preview Photos In Windows Explorer

    While in Windows Explorer, Press ALT + P and a preview should appear on the right.

  18. Desktop Magnifier

    Press the Windows Key and the Plus Key to zoom in or Windows Key and the Minus Key to zoom out. You can zoom anywhere on the desktop and you can even configure your magnifier. You can choose to invert colors, follow the mouse pointer, follow the keyboard focus, or the text insertion point.

  19. Minimize Everything Except The Current Window

    Press the Windows Key + Home Key.

  20. TroubleShoot Power Management

    Windows 7 can tell you how much power your system uses or provide detailed information about the power usage and issues caused by each application and device. This way you can optimize the way your battery is used, making It last longer. Press the Windows Key and type “POWERCFG –ENERGY –OUTPUT <path\filename>”, and it will create a file called energy-report.html in the folder specified by you, after observing your PC for 60 seconds.

  21. Web Searches From Your Desktop

    Windows 7 lets you search for online resources, by adding a connector that be downloaded for free. For instance, go to http://www.bizzntech.com/flickrsearch and download the Flickr connector. After that, you should see the Flickr Search in your searches folder and you will be able to do it directly from your desktop, without needing to visit their website.

  22. Add Videos To Your Start Menu

    If you were looking for a faster way to access your videos, then Windows 7 has the right answer for you. Right click the Start button, then go to Properties -> Start Menu -> Customize and set the Videos to “Display as a link” and you’re done, you will now find them in the Start Menu.

  23. Shift The Window From One Monitor To Another

    If you are using two or more monitors, then you might want to move the Windows from one to another. There is a very simple way to do it. All you have to do is press the Windows Key + Shift Key + Left or Right Key, depending on what monitor you want to move it to.

  24. Custom Power Button

    There is an option to replace the “Shut Down” button with another action, if you rarely shut down the computer, but you more often restart it or put it on sleep. Right click the Start Button, go to Properties and choose the ‘Power Boot Action” to do whatever you want, from the given options.

  25. Easily Add A New Font

    Adding a new font it’s now easier than ever. Just download the font you want, double click it and you should see the install button.

  26. Stretch The Window Vertically

    You can stretch the active window vertically to the maximum display height by pressing the Windows + Shift + Up Keys. Press Windows + Down Keys if you want to restore it.

  27. Open Windows Explorer

    Press The Windows + E Keys to open a new instance of Windows Explorer.

  28. Create A New Instance Of The First Icon In The Taskbar

    Press Windows + 1 Keys to open a new instance of the first icon in the taskbar. This could prove really useful in some circumstances.

  29. Windows Action Center

    Windows Action Center offers you important information about your PC, like the Antivirus Status, updates, troubleshooting and provides a backup scheduling feature. To access it, go to Control Panel -> System And Security -> Action Center.

  30. Windows Troubleshooting Platform

    This platform can help you solve a lot of issues you may encounter, like the internet connection, hardware devices, poor system performance and more. You can choose what to troubleshoot and it will come with some possible explanations for the problem that might really help you. There are a lot of options, guidance and information available there, so give it a try by typing “troubleshoot” or “fix” after pressing the Windows Key.

  31. Turn Off System Notifications

    System notifications are usually disturbing and aren’t always useful, so you might want to turn some of them off and. This can be done in Windows 7 by double clicking the Notification Area Icons in Control panel. There you can change notifications and icons for the Action Center, Network, Volume, Windows Explorer, Media Center Tray Applet, Windows Update Automatic Updates.

  32. Turn Off Security Messages

    To turn off security messages you have to go to Control Panel -> System and Security -> Action Center -> Change Action Center Settings and you can turn off the following notifications: Windows Update, Internet Security Settings, Network Firewall, Spyware and related protection, User Account Control, Virus Protection, Windows Backup, Windows Troubleshooting, Check for updates.

  33. Cycle Through The Open Programs Via The Taskbar’s Peek Menu

    This works just like Alt + Tab, but opens the menu just above the sidebar, doesn’t seem very useful. Give it a try by pressing The Windows Key + T.

  34. Run A Program As An Administrator

    You can easily run a program as an administrator by pressing Ctrl + Shift while opening it.

  35. Same Program Windows Switching

    If you have more instances of a program running, simply hold Ctrl while clicking on its icon and it will cycle through all the instances.

  36. Auto Arrange Desktop Icons

    You can now forget about the Right Click -> Auto arrange. All you have to do is hold F5 pressed for a bit and the icons will auto arrange.

  37. Encrypt Removable USB Drives

    Encrypting an USB drive has never been easier. Now you can right click on the removable drive and then on the “Turn on Bitlocker”.

  38. Turn Off Smart Window Arrangement

    If you don’t like Windows 7’s new features that arrange your windows intelligently, there’s an easy way to turn it off. Press the Windows Key, type “regedit”, go to HKEY_CURRENT_USER\Control Panel\Desktop and set WindowArrangementActive to 0. After you reboot your system the smart arrangements will be turned off.

  39. Create A System Repair Disc

    Windows 7 features a tool that lets you create a bootable System Repair Disc that includes some system tools and the command prompt. To create it, press the Windows Key and type “system repair disc”.

  40. Hard-Link Migration Store

    The Hard-Link Migration store is only available for new computers and can migrate files, settings, and user accounts. The new Hard-Link Migration Store uses more less disk spaces and takes less time.

  41. Turn Off ‘Send Feedback’

    The current Beta version of Windows 7 is all about feedback from its testers, but if you feel disturbed by it, there is a way to turn it off. Press the Windows Key and type ‘regedit’, then go to HKEY_CURRENT_USER\Control Panel\Desktop and set FeedbackToolEnabled to 0. After you restart the computer, it shouldn’t be there anymore. Also, if you want to turn it on again, set the FeedbackToolEnabled to 3.

  42. Improved Calculator

    Windows 7 features an improved calculator that can do unit conversion, date calculation, gas mileage, lease, and mortgage. Also you can choose between Standard, Scientific, Programmer, and Statistic calculator.

  43. Open A Folder In A New Process

    Windows 7 opens all folders in the same process in order to save resources, but this means if one folder crashes, they all crash. So if you feel like that’s a risk you don’t have to take, then you have to open them all in their own processes. To do this, hold down Shift, right-click the drive and “Open in New Process”. Now you will be safe.

  44. Problem Step Recorder

    The Problem Step Recorder is a great tool that can be used in more circumstances. You can turn it on by pressing the Windows Key, then typing “PSR.exe” and click Record. Now it will record all your moves and save them as a HTML document that you can view or write descriptions to it. This can help you with troubleshooting or when writing a guidance or tutorial.

  45. Free Codecs Pack

    Unfortunately, Windows Media Player still isn’t able to play many audio and video files, so you will still need some codecs. But with the free codecs pack you can download here you shouldn’t have any problems.

  46. Start Windows Explorer From My Computer

    Windows Explorer opens in the Libraries directory by default. Most of us are used to see the My Computer page instead. To change it to My Computer, press the Windows Key, then type “explorer”, select Properties and in the Shortcut tab type “%SystemRoot%\explorer.exe /root,::{20D04FE0-3AEA-1069-A2D8-08002B30309D}”. Now you have to right-click the Explorer icon in the Taskbar and hit “Unpin this program from the taskbar” and then drag it back from the Start Menu.

  47. Clear The Desktop

    If there are too many windows on the desktop, you can clear it by shaking a window from left to right and all others will minimize. To restore the other windows you have to shake the active one again.

  48. Use Gadgets With UAC Turned Off

    Maybe you noticed that once you turn off UAC you can’t use the gadgets anymore, as a security measure. But if you want to risk using them, there a simple way to do it, even with UAC turned off. Press the Windows Key, type ‘regedit’, go to HKEY_LOCAL_MACHINE\SOFTWARE\Microsoft\Windows\CurrentVersion\Sidebar\Settings and create a DWORD value named AllowElevatedProcess and set its value to 1. Now you should be able to use your gadgets. If not, then reboot your PC and you should be done.

  49. Fix The Media Player & Media Center MP3 Bug

    Both Windows Media Player and Windows Media Center come with a bug that can damage your MP3s by filling missing metadata automatically on imported MP3 files. This can cut a few seconds from the beginning of the tracks and can prove really disturbing. This problem was fixed by Microsoft using the fix located here.

  50. Search Everything In Your Computer

    Windows 7 offers the possibility to search all file types, including unknown ones and this could help you in some cases. Though it is not recommended, because it’s much slower than normal search, you can give it a try by doing the following: Launch Windows Explorer, go to Tools -> Folder Options -> View and check “Try to search the content of unknown file types”. If you don’t need it anymore, don’t forget to clear it for an increase in speed.

  51. Mouse Gestures

    Windows 7 has not only brought gestures for those who use touchscreen devices, but for mouse users too. So, instead of right-clicking a Taskbar icon to access the jump list, you can hold left-click and drag upwards to smoothly call it up. In addition, clicking and dragging down the address bar in Internet Explorer will open the browsing history. There might be more gestures yet not discovered.

  52. Configure Your Music Favorites

    If you’ve already fixed the Windows Media Center, now you might think of ways to improve your experience with it. The Media Center creates a list of favorite songs based on how often you play them, your ratings and date you’ve added them. If you aren’t comfortable with the way they thought it out, change the way it sorts your favorites by going to Tasks -> Settings -> Music -> Favorite Music.

  53. Turn Off Recent Search Queries Display

    Windows 7 holds and displays the recent search queries by default. This can often prove to be irritating. No need to stress though because it can be disabled. Press the Windows Key, type gpedit.msc, then go to User Configuration -> Administrative Templates -> Windows Components -> Windows Explorer and double click on “Turn off display of recent search entries”.

  54. Advanced Disk Defragmentation

    Fortunately, Windows 7 offers much better defragmentation than Vista and also lets you configure it a bit from the command line. To do it, press the Windows Key and then type CMD. You can defragment your hard disk from the command line by typing “defrag” and you have the following options: /r will defrag multiple drives simultaneously, -a performs a defrag analysis, -v prints the report, -r treats files with at least 64 Mb of fragments like are not fragmented, -w will defrag everything. An example is “defrag C: -v -w” to defrag the whole drive C.

  55. Make Internet Explorer 8 Load Faster

    If you want Internet Explorer 8 to load faster, you need to disable the add-ons that slow it down, so go to Tools -> Manage Add-ons and check the load time for each one. You can choose for yourself the ones you can live without and ones that would increase the load speed.

  56. Media Center Automatic Download

    Windows Media Center 12 allows you to schedule data downloads, so it can be done without disturbing you. To do it, go to Tasks -> Settings -> General -> Automatic Download Options and you can configure it to start and stop the download whenever you want.

  57. Remove The Sidebar

    Windows 7 doesn’t seem to feature the sidebar anymore, but it still exists and runs in the background, being launched automatically at startup. So if you want to get rid of it, there are two ways. The easier one is to press the Windows Key, type MSCONFIG.EXE, click the Startup tab and clear the Sidebar box. The hard way is to press the Windows key, type “regedit”, find and delete the registry key at HKEY_CURRENT_USER\Software\Microsoft\Windows\CurrentVersion\Run. This can save you some RAM consumed with no use.

  58. Volume Tweaking

    Don’t you like that Windows 7 automatically reduces the volume when it detects PC calls? You can turn off this feature by right-clicking the speaker icon in the taskbar, go to Sounds -> Communications and get rid of it.

  59. Run A Program As Another User

    Windows 7 comes with the possibility to run a program both as an administrator or another user, by right clicking on the executable or shortcut while holding down the Shift key. Then you have to select “Run as another user”.

  60. Use Virtual Hard Disk Files

    You can now create and manage virtual hard disks files in Windows 7 as if they were real disks. This can allow you to use a live Windows installation on the virtual disk without the need to boot the virtual Computer. To create a virtual disk you have to press the Windows Key, right-click on Computer, then go to Manage -> Disk Management -> Action -> Create VHD. There you can specify the location and size of your virtual hard disk file.

    To attach the virtual disk file, press the Windows Key, right-click Computer, then go to Manage -> Disk Management -> Action -> Attach VHD and you have to specify the location and if it’s read only or not.

    To initialize a virtual hard disk, press the Windows Key, right-click on Computer, go to Manage -> Disk Management -> Action -> Attach VHD, specify the location, click Ok, then right click on the virtual disk and click on Initialize Disk. Select the partition style you want to use and then right-click on the unallocated space and click “New Simple Volume” and follow the instructions wizard. Now, a new hard drive appears in Windows Explorer and you can use it as a real partition.

  61. Remove The Windows Live Messenger Tab In The Taskbar

    To get rid of the Windows Live Messenger Tab and put it back in the system tray, where it belongs, go to C:\Program Files\Windows Live\Messenger, right-click msnmsdgr.exe and set its compatibility mode to Windows Vista.

  62. Lock The Screen

    There is no Lock Screen button in the Start Menu anymore, so you have to press the Windows Key + L to lock it, now. It seems easier, in case you don’t forget the shortkey.

  63. Create A Screen Lock Shortcut

    In case you don’t like shortkeys or you keep forgetting them, there’s another option for screen lock. Simply create a new shortcut to C:\Windows\System32\rundll32.exe user32.dll,LockWorkStation and place it whenever you want.

  64. Enable Run Command In Start Menu

    If you miss the old Run Command button in XP, then there’s an option to get it back in Windows 7. Right-click an open area in Start Menu, go to Properties -> Start Menu -> Customize and check “Run Command. Now you should be done.

  65. Improve Desktop Window Manager For Nvidia Graphics

    Sometimes the animations for Desktop Window Manager don’t look very well and aren’t smooth enough and this is cause because Desktop Window Manager renders effects with no transparency and blurring, but you can turn off animations for more pleasant graphics. Press the Windows Key, right-click on Computer, go to Properties -> Advanced System Settings -> Performance -> Settings and clear “Animate windows when minimizing and maximizing”. Click OK to finnish.

  66. Change Default Save Location For Files

    Windows 7 is a bit different from Vista, because it saves Documents, Pictures, Videos and Music under the Public folder inside C:\Users. You might not want to save your documents, pictures, videos or music to this location, but create your own locations and you can do it quite easy. Press the Windows Key, Click your username and double-click on the folder you wish to change. Then you will see Includes: 2 library locations. Click on that text, right-click on the folder you wish to set like default and click “Set as default file location”, then click Ok.

  67. Make 64bit Windows Media Player Default ( only for X64 users )

    Windows comes with the 32bit version of Media Player by default. If you are a x64 user, you can keep the system cleaner by only installing one set of codecs. To do this, press the Windows Key, type “command”, right-click on Command Prompt and hit “Run as administrator”, then type “unregmp2.exe /SwapTo:64″. After that, press the Windows Key, type “regedit”, go to HKLM\Software\Microsoft\Windows\CurrentVersion\App Paths\wmplayer.exe\, double click on value and change “%ProgramFiles(x86)” to “%ProgramFiles%”. Now you should be using the 64bit Windows Media Player.

  68. Open Multiple Instances Of Windows Explorer Via The Taskbar

    If you want to run more instances of the Windows Explorer just by hitting the startbar, you can do it by following these steps: Unpin Windows Explorer from the Taskbar, then press the Windows Key, go to Accessories, right-click Windows Explorer, go to Properties and change the shortcut path to %SystemRoot%\explorer.exe /root,::{20D04FE0-3AEA-1069-A2D8-08002B30309D} ( if you want it to default to My Computer ) or %SystemRoot%\explorer.exe /root,::{031E4825-7B94-4dc3-B131-E946B44C8DD5} ( if you want it to default to Libraries ). Now repin Windows Explorer to your Taskbar and you’re done. All that is required for opening more instances of it is just a click of the middle mouse button. If you aren’t pleased with what you’ve done, change the shortcut path back to %SystemRoot%\explorer.exe.

  69. Make The System Tray Clock Show The AM / PM Symbols

    By default Windows 7 does show the time in 24 hour format, so if you want to get the AM / PM symbols, press the Windows Key, type intl.cpl to open Regional and Language Options, go to Addition Settings -> Time where Long Time is set to HH:mm and change it to HH:mm tt, for example, where tt is the AM or PM symbol ( 21:12 PM ). To change it to the 12 hour format, you need to type it like this hh::mm tt ( 9:12 PM ).

  70. Internet Explorer 8 Compatibility Mode

    If your websites don’t render correctly, you might need to enable Internet Explorer 8 display them in compatibility view. This issue is because of the updated rendering engine, which causes a lot of trouble. To do it, open Internet Explorer, go to Tools -> Compatibility View Settings and check “Display all websites in compatibility view”, then click Ok.

From: http://www.softsailor.com/news/887-70-useful-windows-7-tips-tricks.html

Read More >>>>

DiggIt! Del.icio.us Reddit

NOTE: This is some advanced stuff and you may lose a finger. No warranty express or implied. There's always workarounds somewhere on the 'tubes, but this stuff works only in Win7 or Windows Server 2008 R2. Be afraid.

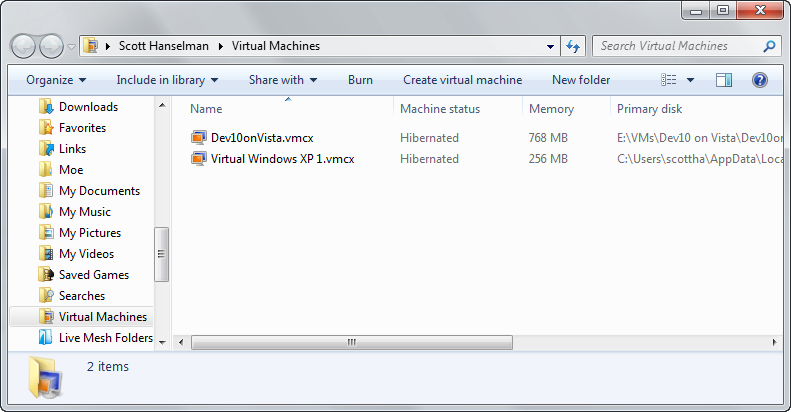
I use a lot of Virtual Machines. I've used VMWare, VirtualBox, HyperV and Virtual PC. Recently, since all my machines have been updated to Windows 7 RC, I've downloaded Windows Virtual PC so I could use "Virtual XP." I've got a lot of VHD (Virtual Hard Drive Files) around now.

You can see here where I've got a VM called "Dev10onVista" because I can use not just Windows XP, but also Vista. However, it's still a VM and it's slower than I'd like.

Dan has a great post on the pros and cons of Virtualization vs. Dual Booting. He points out:

  • Multiboot:
    • Good performance (runs natively on the machine, no extra abstraction layers)
    • Good hardware integration (everything that is built into or attached to the machine is visible to the running OS)
    • Clunky setup (different boot loaders overwriting each other, partitions cannot easily be resized or moved around)
  • Virtualisation
    • Very flexible (only takes up as much hard disk space as the solution requires)
    • Can run virtually any Operating System
    • Non-Optimal performance (running piggyback off another Operating System, consuming resource in both)
    • Marginal hardware integration (all major system components are virtual only; depending on the virtualisation solution, SOME components might be surfaced inside the virtual machine)

This is right on. I'm always afraid to multi-boot, concerned that one OS will some how make one of the others angry, as they are all sharing disks.

Virtual Machines

I'm just not willing to install VS2010 Beta 1 on bare hardware just now, as I know I'll want to put the Next Beta on a clean machine. I *could* sacrifice an extra machine, but I'd rather use the main machine I always use. I want less virtual, more machine.

Mounting/Attaching VHDs like Hard Drives

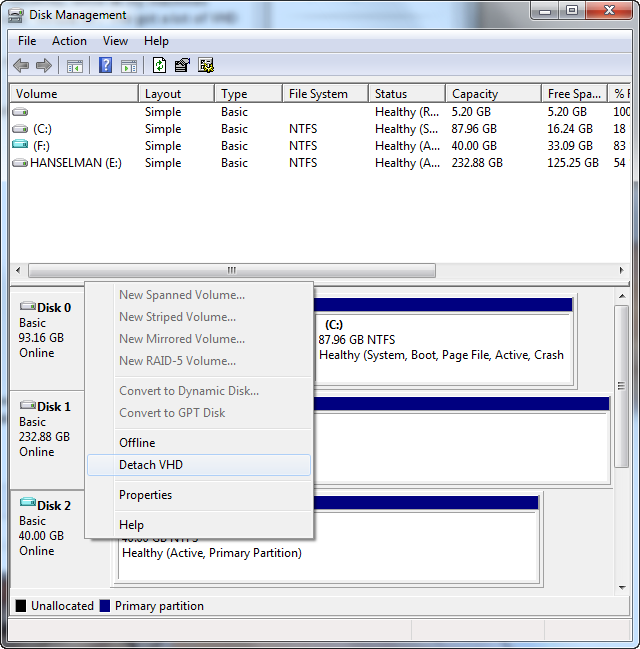
With Windows 7 I can mount VHD and use them like regular hard drives. Just type in "Disk Management" from your start menu. From the Action menu I can select "Create VHD" or "Attach VHD." Below I'd just attached a 7 GIG VHD file that thinks it's a 40 gig hard drive. Notice that the disk icon is blue. This is a really convenient way to just "pass a hard drive around as a file" as well as a nice way to get files on and off VMs that aren't running.

Disk Management (3)

The best part is that I can make one of these during Windows 7 setup (NOTE: This is advanced and may hurt you, your computer, or your cat.) and install Win7 directly to it.

Install Windows 7 to a new, fresh VHD

Assuming you already have a Windows 7 installation, you can boot off the Windows 7 DVD, and when it gets to "Install Now" click "Repair Your Computer." Don't select an installation, then select Command Prompt. (You can also press Shift-F10) to open a command prompt.

From the Command Prompt, run "diskpart."

Make a new VHD on an internal fixed disk:

create vdisk file="C:\win7\win7.vhd" type=expandable maximum=50000


This will make an expandable VHD with a 50Gig max, for example. Now select it and attach/mount it:


select vdisk file="c:\win7\win7.vhd"
attach vdisk


Type "exit" and go back to the setup window and install Win7. Make sure you select the correct disk - the new virtual one!


Setting up your Windows Boot Menu to boot to an Existing VHD


If you have an existing Win 7 VHD already, or perhaps you've taking your Windows 7 installation Disc and "syspreped" a VHD image. Now, from an Administrator Command Prompt, you need to tell the Windows Boot Manager that there's another option. You go:


C:\>bcdedit /copy {current} /d "My New VHD Option"


This will return a GUID. Select it using the Mark command by right-clicking in the Command Prompt and copy it to the clipboard.


Now, using that {guid}, type these commands:


C:\>bcdedit /set {guid} device vhd=[driveletter:]\<directory>\<vhd filename>
C:\>bcdedit /set {guid} osdevice vhd=[driverletter:]\<directory>\<vhd filename>
C:\>bcdedit /set {guid} detecthal on


See the [driveletter:] stuff in brackets? It's NOT obvious, but you need to include those, so:


bcdedit /set {guid} device vhd=[C:]\win7\win7.vhd


You can confirm it's setup with bcdedit /v:. You'll see something like this. The interesting part is at the bottom.


Windows Boot Manager
--------------------
identifier {9dea862c-5cdd-4e70-acc1-f32b344d4795}
device partition=C:
description Windows Boot Manager
locale en-US
inherit {7ea2e1ac-2e61-4728-aaa3-896d9d0a9f0e}
default {34433bb7-628f-11dc-a941-001a6bcd5d3a}
resumeobject {34433bb8-628f-11dc-a941-001a6bcd5d3a}
displayorder {34433bb7-628f-11dc-a941-001a6bcd5d3a}
{280ffa1e-f8a9-11dd-b0a9-001c26fdc6b4}
toolsdisplayorder {b2721d73-1db4-4c62-bf78-c548a880142d}
timeout 30
custom:45000001 1

Windows Boot Loader
-------------------
identifier {34433bb7-628f-11dc-a941-001a6bcd5d3a}
device partition=C:
path \Windows\system32\winload.exe
description Windows 7
locale en-US
inherit {6efb52bf-1766-41db-a6b3-0ee5eff72bd7}
recoverysequence {280ffa1b-f8a9-11dd-b0a9-001c26fdc6b4}
recoveryenabled Yes
testsigning Yes
osdevice partition=C:
systemroot \Windows
resumeobject {34433bb8-628f-11dc-a941-001a6bcd5d3a}
nx OptIn
custom:42000002 \system32\winload.exe
custom:45000001 2
custom:47000005 301989892
3

Windows Boot Loader
-------------------
identifier {280ffa1e-f8a9-11dd-b0a9-001c26fdc6b4}
device vhd=[C:]\VMs\Win7\Win7.vhd,locate=custom:12000002
path \Windows\system32\winload.exe
description Win 7 VHD - Dev10
locale en-US
inherit {6efb52bf-1766-41db-a6b3-0ee5eff72bd7}
recoverysequence {280ffa1b-f8a9-11dd-b0a9-001c26fdc6b4}
recoveryenabled Yes
testsigning Yes
osdevice vhd=[C:]\VMs\Win7\Win7.vhd,locate=custom:22000002
systemroot \Windows
resumeobject {34433bb8-628f-11dc-a941-001a6bcd5d3a}
nx OptIn
detecthal Yes
custom:42000002 \system32\winload.exe
custom:45000001 2
custom:47000005 301989892
3


If it doesn't work, you can always run bcdedit /delete {guid} /cleanup and try again.


Here's what my Boot Manager (pressing F8 when I start up my machine) looks like now:


My Win 7 Boot Manager


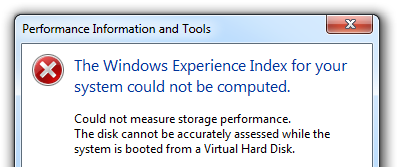
Now, I can boot up with my VHD mounted. Am I running a Virtual machine? No. I'm running Windows, on the hardware, with only the DISK Virtualized. I don't work for that team, but I'm guessing I'm losing 3-5% (that number came out of my butt) on the disk side - and nothing anywhere else. How do I know? Well, Windows Experience is smart enough to keep me from checking (although I could use another disk tester tool, but I'll leave that as an exercise to the Reader.).


Performance Information and Tools


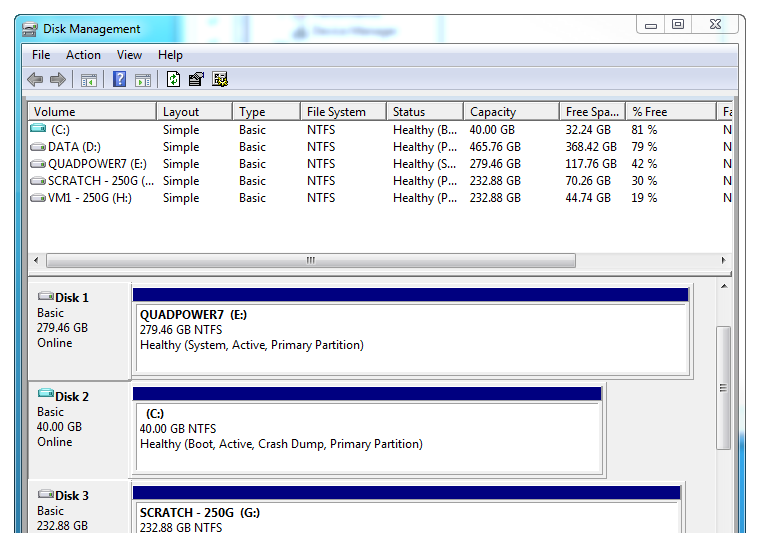
I notice that Disk Management still gives me access to my was-C: drive, even though the VHD is now my C. My hardware C: drive got moved down, and it's E: now. Nice than I can still see it!


Disk Management (2)


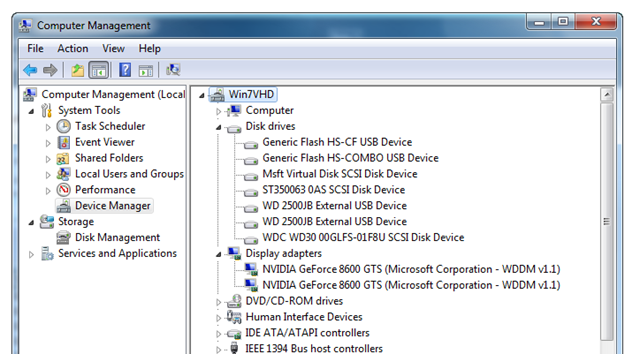
What does the Device Manager say? It says the Msft Virtual Disk SCSI Disk Drive is there! That's the only "virtual" thing going on here. Notice I've still got my actual Video Drivers (running multiple monitors across multiple display drivers). All my stuff is there, because I've got, forgive me, less virtual and more machine.


Computer Management


Hey, are those my four processors and my 8 gigs or RAM? Ah, yes, they are.


Windows Task Manager


Love it. I'm going to use the hell out of it.


A few caveats. One, I haven't figured out how boot off a VHD that is on USB or External Drive. I'm looking into it. It may be because there's no drive letter assigned yet, or that I'm an idiot. We'll see. Second, doing this makes your VHD less portable, because if you move it inside Virtual PC or to another machine, all the devices will freak out and try to reinstall (or maybe just not work) so be aware of that.


That said, I'm running Visual Studio 2010 Beta 1 without fear on my awesome hardware with hardware-speeds. Shiny.


From: http://www.hanselman.com/blog/LessVirtualMoreMachineWindows7AndTheMagicOfBootToVHD.aspx
Read More >>>>

DiggIt! Del.icio.us Reddit

Though the Windows 7 RC SDK was released about 2 weeks before Visual Studio 2010 Beta 1, it was not possible to incorporate that release into VS 2010 Beta 1. As a result, the Windows SDK components that ship as part of Visual Studio 2010 Beta 1 are the Windows 7 Beta SDK versions.

This post will describe how you can use the Native Multitargeting feature in Visual Studio 2010 to compile and link your applications against the Windows SDK supporting Windows 7 RC.

Step 1: Download and install the RC SDK from http://www.microsoft.com/downloads/details.aspx?familyid=F75F2CA8-C1E4-4801-9281-2F5F28F12DBD&displaylang=en

Step 2: Add the Windows 7 SDK as a platform target to Visual Studio:

  • a) Download the Windows7SDK.zip file attached to this blog post.
  • b) Extract the zip file into The Program Files directory (On 64 bit versions of Windows into the Program Files (x86) directory) by opening it up in Explorer and selecting Extract All Files. In the dialog select the appropriate directory. If you are unsure what the Program Files Directory is on your system, you can type %ProgramFiles% (or %ProgramFiles(x86)% for a 64 bit OS) into the Address bar of an Explorer window and press enter. The Address bar will then show the correct path that you can copy and paste. Extract, then answer yes to the question about merging contents of the directories.
  • c) After the extract, verify that the directory %ProgramFiles%\ MSBuild\Microsoft.Cpp\v4.0\Platforms\Win32\PlatformToolsets\Windows7SDK was created and contains the following 2 files: Microsoft.Cpp.Win32.Windows7SDK.props and Microsoft.Cpp.Win32.Windows7SDK.targets. (For a 64 bit OS, the directory should start at %ProgramFiles(x86)%).

For each project that you want to target at the RC version of the Windows 7 SDK do the following:

  • 1) Open the Solution containing the project.
  • 2) Right Click the Project node in the Solution Explorer pane and select Properties.
  • 3) Select the Configuration Properties, General from the list in the left pane.
  • 4) Select All Configurations in the Configuration dropdown.
  • 5) Select Windows7SDK in the Platform Toolset option in the right pane under the General category.

[Image]

Note that the platform configuration we added is just for developing 32-bit applications. One could create a similar Platform for X64 builds, but these are not included here.

We have verified basic correctness, but have not run a comprehensive set of test cases. More specifically this is the level of correctness testing we have done:

Built an MFC app and a Windows Forms app with Dev10 targeting v100
Built an MFC app and a Windows Forms app with Dev10 + WinSDK toolset targeting v100
Built an MFC app and a Windows Forms app with Dev10 + WinSDK toolset targeting WinSDK7RC
Built an MFC app and a Windows Forms app WinForms with Dev10 + WinSDK toolset + WinSDK RC installed and targeting v100
Built an MFC app and a Windows Forms app with Dev10 + WinSDK toolset + WinSDK RC installed and targeting WinSDK7RC

Note that some Windows 7 RC SDK samples do not build in Visual Studio 2010 Beta 1. We are investigating these issues and will publish information about this on the Windows SDK team blog as it becomes available.

We will also be posting specifically about Native Multitargeting in detail in the next couple weeks on the Visual C++ blog. If you are interested in some background information before that, please take a look at the following entry on Soma's blog giving a brief overview: http://blogs.msdn.com/somasegar/archive/2008/11/21/c-enhancements-in-vs-2010.aspx

From: MSDN Blog

Read More >>>>

DiggIt! Del.icio.us Reddit

Since Windows 7 RC download is available to public. How sure that our pc machine is completely capable to run Windows 7 flawlessly ? So, here is Windows 7 upgrade advisor software to determine whether or not your PC is able to run Windows 7 or meet Windows 7 System requirement.

Firstly, Windows 7 upgrade Advisor will analyze whether your Windows operating system is compatible for Windows 7 upgrading. Then check Windows Mail and parental control software.

windows 7 upgrade advisor

After Windows 7 upgrade advisor check OS and software capabilities, then the tools check your computer hardware such as CPU processor, storage, memory and graphics as well as identifies any compatibility issues with installed devices. Don’t worry this tool will not leave you in the dark should you have any compatibility issue; it provides you guidance on how to sort out the problem.

However, This Windows 7 upgrade advisor is available on English only. Beside that, this Windows 7 upgrade advisor has some requirement before checking your computer.

Windows 7 Upgrade Advisor Software Requirements

  • Operating Systems: Windows Vista; Windows XP Service Pack 2, Windows 7
  • .NET 2.0 Framework or higher if running on Windows XP

Download Windows 7 PC Advisor Beta

Read More >>>>

DiggIt! Del.icio.us Reddit

If you want to become an expert in the Windows 7 OS then go through the variety of Microsoft training, books, and certifications that are available for free to help you gain the skills and knowledge you need to succeed. Microsoft has also released some free eLearning content to enhance Windows 7 skills. Free Windows 7 training content which is available on eLearning Clinics is targeted at audiences - Consumers, IT Professionals and Information Workers.

  • What’s New in Windows 7 for Consumers
  • What’s New in Windows 7 for IT Professionals
  • What’s New in Windows 7 for Information Workers

What’s New in Windows 7 for Consumers (1 Hour)
Certain key enhancements has been done in Windows 7 that help you work more efficiently and easily with your computers. The course will provide you with an overview of such enhancements and tools that you can use to organize, find, protect, and share your information. This clinic covers the following topics.

  1. Desktop and Taskbar Enhancements
  2. Sharing, Search, and Security
  3. New Tools and Experiences

What’s New in Windows 7 for IT Professionals (2 Hours)

It will provide you with an overview of the improvements to deployment, security, manageability, and performance in Windows 7 that meets the IT professional needs. This clinic covers the following topics.

  1. Overview of Deployment Enhancements
  2. Overview of Security Enhancements
  3. Overview of Manageability and Performance Enhancements

What’s New in Windows 7 for Information Workers (2 Hours)

It provides you with an overview of key enhancements in Windows 7, which help information workers to improve their productivity as well as work in a more secure environment. This clinic covers the following topics.

  1. Be More Productive with Windows 7
  2. Be More Secure with Windows 7
  3. Get Connected Faster and Easier with Windows 7

From: http://www.aboutonlinetips.com/windows-7-elearning-clinics/

Read More >>>>

DiggIt! Del.icio.us Reddit

I have found a much easier way to install Windows 7 from a USB Flash drive. Unlike other methods where you have to write complicated commands, this method can be completed even by those who have very little computer background.

The whole process takes only two steps, run UNetbootin, load the Windows 7 ISO file, and finally restart your computer. See how we installed Ubuntu from USB using UNetbootin here.

Before you begin, you will require the following:

  • USB Flash Drive (4GB minimum)
  • Windows 7 ISO Image file
  • UNetbootin

Now insert the USB drive, run UNetbootin, and select Disk Image as ISO. Browse your local drive for Windows 7 ISO that you downloaded and click Open. Now Select Type as USB and choose the drive. Once done, it will look like a bit similar to the screenshot shown below.

UNetbootin main windows  7

Click OK and it will begin extracting all installation files to the USB drive. The whole process will take some time(10-15 minutes), so have patience.

unetbootin installing windows 7 iso

Once the installation is complete, reboot your computer. Now while your system is starting up press the appropriate button(usually F1, F2, F12, ESC, Backspace, or Escape) to bring up Bios Boot Menu. Change the startup order to boot USB by default, usually you will have to press F6 to move the selected USB device on top. Once done, save changes and restart the system.

windows 7 install screen - boot

Wasn’t that easy? Enjoy!

From: http://www.addictivetips.com/windows-tips/install-windows-7-from-usb-drive-requires-2-simple-steps/

Read More >>>>

DiggIt! Del.icio.us Reddit

Now most of you with Windows 7 must be playing your hacks on it.  Have you tried installing applications in Windows 7? Well, it's not always a piece of cake. While installing Windows Virtual PC and Windows XP Mode in Windows 7 you might get stuck up with an error message. The file could not be written. Virtual hard disk could not be attached to the virtual machine. Please check the values provided and try again.

imageThings are horrible especially, if you have over-protective antivirus suites like Kaspersky Internet Security. What's  surprises is that the error occurs even if computer hardware specifications matches the system requirements of Windows 7.
After a thorough research I could put the things in shape. I'll share with you how to fix this error in Windows Virtual PC and Windows XP Mode installation.

Before routing to the solution let me tell you cause of the error. The problem lies in the Kespersky Internet Security and Kespersky Anti-virus or other similar security problem. It protects the PC from unknown or potentially malicious application activities. The proactive Application Activity Analyzer fails the installation of Windows XP Mode.

Solution

Now let's see how to fix the problem

Go to the Application Activity Analyzer or Proactive Defense setting (depending on the version of Kaspersky you are using) and disable the detection and scanning of Hidden Object.  Now install the Windows XP mode without any hassle.

Alteratively, you can disable the Kaspersky or any antivirus solution installed on the system. Now install the Virtual Windows XP Mode. After the installation is completed, re-enable the anti-virus protection.

Read More >>>>

DiggIt! Del.icio.us Reddit

When Windows 7 goes on sale 2H’2009 (maybe on October 23), it is expected to create a positive side-effect for the DRAM industry. The OS’s large memory needs will produce a notable increase in DRAM demand, according to Powerchip Semiconductor Corporation (PSC) Chairman, Frank Huang, who expects it to exceed capacity when launched.

Huang believes 3Q DRAM supply will fall short of demand sparked by the hardware and machine ramp-up in advance of Windows 7 going on sale. Windows 7 is expected to not only lift PC purchases, but also spawn upgrades in previous Vista users who will take advantage of the lower cost memory available today.

It’s believed the new OS and its memory requirements will contribute to the entire DRAM chip sector, which for the last two years has been in the midst of its largest ever decline — something caused by DRAM makers erroneously believing previously that Vista would spark a huge increase in DRAM demand.

Huang reported that, due to the decline, Samsung and Hynix have begun phasing out their 200mm wafer production lines, and have allocated new capacity for expansions in NAND flash chip production.

DRAMeXchange shows that spot prices have increased to $1.30 per 1Gb eTT DDR2 chips, which is notably higher than the sub-$1.00 price seen at the end of April, and well on its way to projected $1.50 by the start of 3Q, as was predicted earlier by Kingston Technology’s Scott Chen.

Microsoft is receiving extremely positive reviews from its Windows 7 beta program, which is unprecedented in scope in the company’s history. The company has also officially announced Windows 7 will be available by “the holiday season”.

Rick’s Opinion

DRAM is cheap, cheap, cheap. For those who build computer systems as a hobby or for family and friends, if you’ve been out of the game for a year or two, you might be amazed. NewEgg is selling 4GB DDR2-800 (PC2 6400) modules for $55.49 with free shipping (8GB will cost you $110.98). And if your motherboard has four slots, you can go with 4x 2GB chips, which are selling for $37.99 for DDR2-800 (PC2 6400) in 2x 2GB blocks, for $37.99 (meaning 8GB will cost you $75.98).

I can remember buying 1GB of memory for my old dual-socket Intel Pentium III Xeon machine (4x 256MB DIMMs) and paying well over $400 for it. Today, DDR2-667 (PC2 5400) 512MB DIMMs sell for $7.99 each. It’s just amazing.

When these per-chip prices (each DIMM is made up of several eTT DDR2 chips of various capacity, such as 16Gb, 32Gb, 64Gb, etc.) reach the $1.50 per 1Gb mark, the end-user won’t see much of a price change — at least not at first. However, the companies selling DRAM will again become either profitable, or they’ll begin losing less money as DRAM has always been an extremely tight industry for revenue, cost of manufacturing and market conditions. (Source)

Read More >>>>

DiggIt! Del.icio.us Reddit

WiFi is an incredible technology that has transformed how and where people used computers, however besides advancements in speed, range and security, very little has changed how we use wireless networks. Since 2002, Microsoft Research has been exploring a fascinating idea to virtualize the WiFi adapter, turning a single piece of hardware and radio into virtually (pun) unlimited adapters. Years after the project was seemingly abandoned, it is now uncovered Virtual WiFi technology has been baked into the Windows 7 networking foundations.

In essence, how Virtual WiFi works is very similar to how virtualization works for operating systems which most people are familiar with - the transparent sharing of limited hardware resources to many operating systems. Virtual WiFi, abbreviated to VWiFi, is a software layer that abstracts the wireless LAN card hardware into multiple virtual adapters. The software handles the connections of each adapter to ensure every adapter has an opportunity to connect to their respective networks limited by time. The result is an operating system none-the-wiser and acts as if you have multiple WLAN hardware adapters working independently.

If you like to dabble in a little hardware jargon, here’s an obligatory architecture diagram which explains how Virtual WiFi works in Windows 7 in much more detail.

vwifi_architecture

If you got lost somewhere between the dotted lines, read on.

You might be wondering why anyone would ever need multiple WLAN adapters on the same PC, well to be honest, you don’t need but its sometimes good to have. In any case where you’re connected to an existing wireless access point and want to connect to another network whether that be a separate access point or even set up an ad-hoc connection, Virtual WiFi will allow you to do just that. But perhaps the scenario that is more appealing is the idea of a mesh network. In a mesh network, every client becomes a repeater, growing the network organically as more clients connect. Virtual WiFi enables this, since every client can become an access point too.

Now you might be asking, “I’ve looked at every nook and cranny of Windows 7 RC, how come I haven’t seen this feature?”. Surprisingly, the feature is in Windows 7 today and has been for quite some time apparently, but hasn’t been exposed due to a lack of driver support. WLAN hardware vendors are required to recompile their drivers with a couple new additions. The good news is that Virtual WiFi functionality is going to be a requirement for WLAN drivers under the Windows 7 certification logo so expect to see it soon.

Assuming it all goes to plan, the feature will be automatically exposed.

“On Windows 7 and later, the operating system installs a virtual device if a Hosted Network capable wireless adapter is present on the machine. This virtual device normally shows up in the “Network Connections Folder” as ‘Wireless Network Connection 2’ with a Device Name of ‘Microsoft Virtual WiFi Miniport adapter’ if the computer has a single wireless network adapter. This virtual device is used exclusively for performing software access point (SoftAP) connections [...]. The lifetime of this virtual device is tied to the physical wireless adapter. If the physical wireless adapter is disabled, this virtual device will be removed as well.”

Unfortunately as it seems, the implementation of Virtual WiFi in Windows 7 is not as liberal as the research prototype. In Windows 7, you are limited to exactly one virtual adapter. However by looking at the impact of multiple virtual adapters on latency and performance from their original research report, this is probably for good reasons.

More technical information aimed at hardware vendors and developers is available at the WinHEC 2008 session, “Wireless LAN Enhancements In Windows 7″, PowerPoint downloadable here. You can also learn more about their original prototype and research paper here.

Obviously this feature isn’t as glamorous as the fancy new wallpapers or as practical as Aero Snap in Windows 7, but I think it represents one of the many silent revolutions in Windows that probably won’t be recognized and taken for granted for releases to come. I’d be interesting to see if Virtual WiFi catches on, and how new networking scenarios can be enabled by developers and hardware vendors. (Source)

Read More >>>>

DiggIt! Del.icio.us Reddit

[Image]

Windows 7 is free for now, and works extremely well on netbooks. That said, installing the OS on these tiny laptops—especially low-end models—can be daunting. Here's how to do it, the easy way:

If the Release Candidate is any indication (and it should be), then Windows 7 will be a nice upgrade for any Windows user. The new OS, however, is a huge step up for netbook users. Vista is notoriously poorly suited to netbooks; a buggy resource hog that subjects its users to incessant dialog boxes and requires far too many clicks to perform basic tasks, it's kind of a nightmare to use on a 9-inch laptop with a 1.5-inch trackpad.

Windows XP has been given a boost by netbooks, as its system requirements—more-or-less decided in 2001—are more in line with the specs hardware like the Eee PC and Mini 9. But let's face it: XP is nearly a decade old. Its user experience is trumped by free alternatives like Ubuntu Netbook Remix and Linpus, and it's not at all optimized for solid-state drives—especially cheap ones. This means that on low-end, SSD-based netbooks, it borders on unusable.

Hence, Windows 7. It's noticeably faster than Vista on low-spec machines, properly optimized for netbook hardware, and, most importantly, free (for now). Thing is, installation isn't quite as easy as it is on a regular PC—in fact, it can be a pain in the ass: netbooks don't have DVD drives, which means you've either got to get your hands on an external drive or boot from a USB stick for a clean install. Furthermore, smaller SSDs, like the 8GB units in popular versions of the Dell Mini 9 and Acer Aspire One, make a default installation impossible, or at least impractically tight. Luckily, there are simple methods to deal with both of these problems. Let's get started.

What You'll Need

• A netbook (Minimum 1GB of RAM, 8GB storage space)

• A 4GB or larger USB drive

• A Windows 7 RC Image (details below)

• A Windows XP/Vista PC or a Mac to prepare the flash drive

• For low-end netbooks, lots (and lots) of time

Getting Windows 7

[Image]Downloading Windows 7 is a piece of cake. Just navigate to this page and download the 32-bit version. You'll need to get a free Windows Live ID if you don't already have one, but this takes about two minutes.

Microsoft will then give you your very own Windows 7 License key, valid until June 1st of next year. (Although after March 1st, it'll drive you to the edge of sanity by shutting off every two hours. But that's a different story, and March is a long way off). Microsoft will then offer up your ISO through a nifty little download manager applet, complete with a "resume" function. There are ways to sidestep this, but don't: you'd be surprised how hard it is to keep a single HTTP connection alive for long enough to download a 2.36GB file.

Preparing Your Flash Drive

This is the annoying part, but it's not necessarily that difficult. Here are some guides, by OS (some linked for length):
Windows XP
Windows Vista
• Mac OS X (courtesy of Ubuntu, funnily enough):


1. Open a Terminal (under Utilities)

2. Run diskutil list and determine the device node assigned to your flash media (e.g. /dev/disk2)

3. Run diskutil unmountDisk /dev/diskN (replace N with the disk number from the last command; in the previous example, N would be 2)

4. Execute sudo dd if=/path/to/downloaded.iso of=/dev/diskN bs=1m (replace /path/to/downloaded.iso with the path where the image file is located; for example, ./windows7.iso)

5. Run diskutil eject /dev/diskN and remove your flash media when the command completes (this can take a few hours on slower drives)

As some commenters have pointed out, you can also make a flash drive bootable with utilities like LiveUSB Helper. Once you've done this, you can mount your Windows 7 ISO with a utility like DaemonTools Lite (For Windows) or MountMe (for Mac), and just copy over all the files to your newly-bootable drive.

[Image]Starting Your Install

Ok! Now you've got a bootable flash drive, and you're ready to start installing. It should go without saying, but once you start this process, you'll lose all existing data on your netbook, so you should back up any important files before going through with anything from here forward.

Insert your USB drive and reboot your netbook. As soon as your BIOS screen flashes, you should see instructions for a) changing your netbook's boot order or b) entering its BIOS setup. In the first situation, simply assign the USB drive as the first boot device. In the second, navigate through your BIOS settings until you find a "Default Boot Order" page, and do the same thing there.

From there, you should see the first Windows 7 installation screens. Anyone with a 16GB or larger storage device in their netbook can just follow the instructions until the installation completes, and skip the next step.

If your SSD is smaller than 16GB, or if you just want to save some space, do what they say, but only until the first reboot. After the Windows 7 installer has restarted your computer, you'll need to modify the boot order again. Do not allow installation to continue! Manually change the boot order to prioritize the USB drive again, just as you did at the beginning of the installation.

Compression!

Once the Windows 7 installer has copied most of its system files to your drive, you're going to tighten them up with Windows' trusty old "Compact" command. Here's what you do, as described by Electronic Pulp:

Choose "Repair" at the Windows 7 Setup screen, go to "Command Prompt" and enter the following code:

d: (or whatever drive letter is assigned to your SSD)
cd \windows\system32
compact.exe d:\*.* /c /s /i

And wait. And wait and wait and wait. This can take anywhere from eight hours to two days, so you'll want to set your netbook down in a corner and forget about it for a while. [Note: compressing so many of your system files does have a performance cost, but in day-to-day use, it's negligible]

Once this is done, reboot the netbook again and let it continue the installation as normal. That's it!

All said and done, an 8GB SSD should have nearly 2GB of free space left—not much, but enough to work with. And given that most netbooks come with inbuilt, flush SD expansion slots, and that high-capacity SD cards are extremely affordable, having a small amount of space on your root drive isn't at all prohibitive.

There are other ways to slim down a Windows 7 install—namely by using programs like vLite, which can strip out some of Windows' fat directly from the ISO—but Windows' built-in file compression is the easiest way to squeeze Windows 7 onto your skimpy 8GB SSD.

Setup and Customization Help [Image]
Windows 7 runs fairly well out of the box, but as with any new Windows installation, you're going to need to download some drivers to get things working properly. Vista drivers usually do the trick, but sometimes workarounds are necessary. Thankfully, most popular netbooks have spawned helpful fan forums, many of which have active Windows 7 subforums. Some of the best:

Aspire One
ASUS Eee Pc
Dell Mini
MSI Wind
HP Mini-Note

From: gizmodo.com

Read More >>>>

DiggIt! Del.icio.us Reddit

Whenever we talk about Windows 7 on OSNews, you'll always hear me advise you to change the UAC settings by setting it to its highest level, since Windows 7's default simply isn't secure. You might wonder why you should deal with additional prompts - what is the security risk actually like? Well, it's pretty big.

When you run Windows 7 with the default UAC level, a technique using code injection and several components in Windows 7 that can auto-elevate can totally own your system. Microsoft gave several components in Windows 7 special privileges (like notepad.exe and calc.exe) in order to reduce the amount of UAC prompts in Windows. The end result, however, is that these components can be used to bypass UAC completely, and basically get full access to your machine. This works even on the RC.

The proof-of-concept exploit works by injecting its own code into the memory of another process, a process with auto-elevation capabilities. This is done using standard and documented APIs. The first proof-of-concept just copied a file to a location, but further editions could do all sorts of nasty things - and ASLR doesn't help either. This video should give you a good idea. Whiskey tango foxtrot, indeed.

As the writer of the proof-of-concept code explains, the UAC API is a good API, but code does require refactoring to provide a good user experience; to not flood users with prompts. Microsoft did not do this right in Vista, and instead of addressing this issue properly in Windows 7, they took the easy way out by creating UAC backdoors for their own code and programs (the UAC whitelist) as to reduce the number of prompts. This list isn't configurable by the user.

This leads to this weird situation where even though Microsoft have stated that UAC is supposed to nudge developers to fix their code so that it works for limited users as well, Microsoft itself doesn't seem to want to do that. So, to avoid having to fix their own code to work well with UAC, they cheated. This isn't the kind of behaviour that befits an otherwise great release.

At this point in time, the default UAC level in Windows 7, and all levels below that, are insecure. You might as well turn UAC off completely, as it makes no difference to have it either off or at the default level. This entire flaw becomes null the moment you set UAC to its highest setting (as that disables auto-elevation). That's why I always advise you to do so.

Microsoft needs to address this issue before the release, or else malware and virus writers are going to have a field day. It's exactly this kind of braindead decision making that led to years of neglect of Windows NT's advanced security features, creating an environment where malware and viruses could prosper. With Vista, it seemed as if Microsoft finally got their act together, and now, with Windows 7, they're throwing it all away again.

They never learn.

Read More >>>>

DiggIt! Del.icio.us Reddit

Positive feedback from users, as viewed all over the internet, will tell us that Windows 7 is already fast. We will make it even faster with this step-by-step guide.

Windows 7
Get maximum performance out of your Windows 7 by doing the following steps.
1. Right click the computer icon on your desktop and select Properties. After which, click Advanced system settings in the left pane and then click Settings in the Performance section. A new window will open. Disable all unnecessary Visual Effects but keep the following options enabled if desired.

  • Enable desktop composition in case you use Windows Aero
  • Enable transparent glass in case you use transparency
  • Smooth edges of screen fonts
  • Use drop shadows for icon labels on the desktop
  • Use visual styles on windows and buttons
2. In the same computer icon on your desktop, click Manage and go to Services & Applications > Services. Set the following services to Manual or Disable for a faster Windows 7 startup.
  • Application Experience
  • Computer Browser - if not connected to a network
  • Desktop Window Manager Session Manager - if not using the Aero theme
  • Diagnostic Policy Service
  • Distributed Link Tracking Client
  • IP Helper
  • Offline Files
  • Portable Device Enumerator Service
  • Print Spooler - if not using a printer
  • Protected Storage
  • Remote Registry - disable for security purposes
  • Secondary Logon
  • Server - if not connected to a network
  • Tablet PC Input Service
  • TCP/IP NetBIOS Helper
  • Windows Error Reporting Service
  • Windows Media Center Service Launcher
  • Windows Time
3. Open Windows Explorer. Go to Organize > Folder and then Search Options. Click the View tab and then disable the following options:
  • Display file size information in folder tips
  • Show pop-up description for folder and desktop items
4. Type "msconfig" (without the quotes) in RUN or in Start Menu search box and press Enter. Click the Startup tab and disable unnecessary entries to speed up system startup. For example:
  • Graphics card driver utility
  • Sound Card utility
5. In your Control Panel, open sound applet and select No Sounds from the Sound Scheme options.
6. Lastly, do the following for better system performance:
  • Install a reliable and effective anti-virus software
  • Do not install softwares that are unnecessary
  • See to it that you are using the latest device drivers
  • Regularly defragment your hard disks
  • Update your Windows via Automatic Updates
You will surely experience a noticeable performance boost after this procedure.
Read More >>>>

DiggIt! Del.icio.us Reddit